ZEISS VR ONE Plus is a one-of-a-kind device allowing us to take our first steps in the world of virtual reality. Its lightweight design and 100% portability make it the perfect companion for virtual reality experience just like sitting in a movie theater with a Cinema app. In this case, there is nothing better than watching 3D Blu-ray movies via Zeiss VR One (Plus) via iPhone instead of going to the cinema.
 Whatever purposes you are on, importing 3D Blu-ray movies into Zeiss VR for amusement is not a bad choice for you! VR One by default supports most common file formats including MP4 and MOV. When it comes to playing 3D videos, VR One requires side-by-side (SBS) video, but most Blu-rays are in the "frame packed" format. So, we will quickly walk you through the easy solution to view 3D Blu-ray movies with VR One (Plus) via iPhone by converting a 3D Blu-ray to VR One (Plus) friendly file type, so you can watch 3D Blu-ray movies in VR One Cinema app.
Well, to rip 3D Blu-ray movie to VR One (Plus) supported video, you need a 3D Blu-ray ripping tool. Dimo BDmate for Mac, a professional Mac 3D Blu-ray movie converter, is the best choice of converting 3D Blu-rays for VR One. The program is easy to use and can help you rip 3D Blu-ray to MP4, MKV, AVI, WMV, MOV, etc HD media formats.
Best of all, this software allows you to fast convert 3D Blu-ray movies to 3D videos such as MP4 Side-by-Side 3D video, which can be played on VR One (Plus) perfectly. If you are running on Windows PC, please turn to BDmate, which allows you to convert 3D Blu-ray to VR One on Windows (Windows 10 included). Download the excellent 3D Blu-ray Ripper for Mac with right version and start the 3D Blu-ray to VR One (Plus) movie conversion.
Free Download BDmate for Mac/Win:
Whatever purposes you are on, importing 3D Blu-ray movies into Zeiss VR for amusement is not a bad choice for you! VR One by default supports most common file formats including MP4 and MOV. When it comes to playing 3D videos, VR One requires side-by-side (SBS) video, but most Blu-rays are in the "frame packed" format. So, we will quickly walk you through the easy solution to view 3D Blu-ray movies with VR One (Plus) via iPhone by converting a 3D Blu-ray to VR One (Plus) friendly file type, so you can watch 3D Blu-ray movies in VR One Cinema app.
Well, to rip 3D Blu-ray movie to VR One (Plus) supported video, you need a 3D Blu-ray ripping tool. Dimo BDmate for Mac, a professional Mac 3D Blu-ray movie converter, is the best choice of converting 3D Blu-rays for VR One. The program is easy to use and can help you rip 3D Blu-ray to MP4, MKV, AVI, WMV, MOV, etc HD media formats.
Best of all, this software allows you to fast convert 3D Blu-ray movies to 3D videos such as MP4 Side-by-Side 3D video, which can be played on VR One (Plus) perfectly. If you are running on Windows PC, please turn to BDmate, which allows you to convert 3D Blu-ray to VR One on Windows (Windows 10 included). Download the excellent 3D Blu-ray Ripper for Mac with right version and start the 3D Blu-ray to VR One (Plus) movie conversion.
Free Download BDmate for Mac/Win:

 Full Guide: Convert 3D Blu-rays to VR One (Plus) for watching via iPhone
Step 1. Import 3D Blu-ray movie
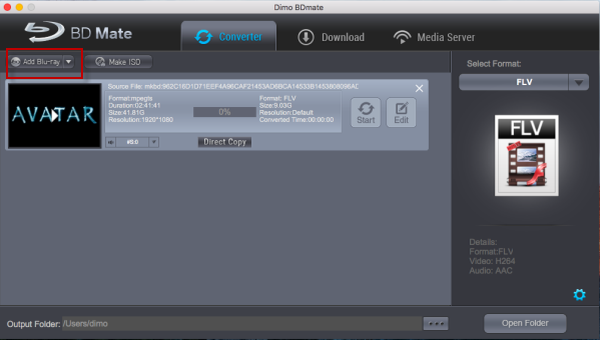
Launch the best 3D Blu-ray to VR One converter. Click "Add Blu-ray" button to add 3D Blu-ray movie to it from BD drive. After the BD files are loaded, you can preview them on the right viewing window and take snapshots of your favorite movie scene if you want.
Full Guide: Convert 3D Blu-rays to VR One (Plus) for watching via iPhone
Step 1. Import 3D Blu-ray movie
Launch the best 3D Blu-ray to VR One converter. Click "Add Blu-ray" button to add 3D Blu-ray movie to it from BD drive. After the BD files are loaded, you can preview them on the right viewing window and take snapshots of your favorite movie scene if you want.
 Step 2. Select output format for VR One (Plus)
Click "Select Format" bar and find "Format > Video", there are a lot of format options for you. "MP4" or "MOV" is recommended for ZEISS VR One.
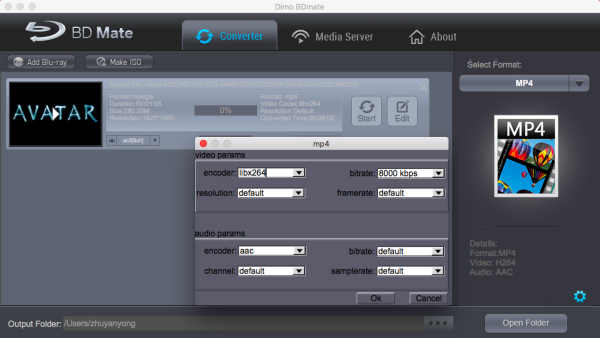
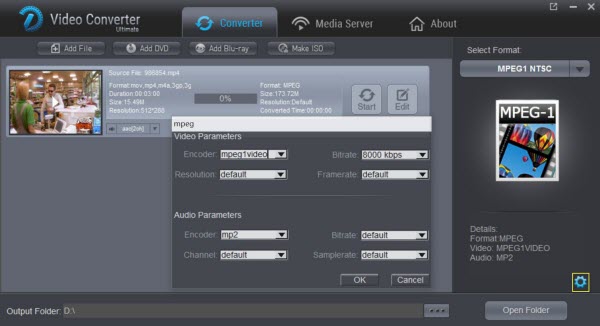
Step 3. Advanced Video/Audio settings
Click "Settings" button to do corresponding settings regarding to video, audio. Note that VR One compatible audio has to be encoded in AAC or MP3. AC3 audio and DTS Dolby don't seem to work.
Step 2. Select output format for VR One (Plus)
Click "Select Format" bar and find "Format > Video", there are a lot of format options for you. "MP4" or "MOV" is recommended for ZEISS VR One.
Step 3. Advanced Video/Audio settings
Click "Settings" button to do corresponding settings regarding to video, audio. Note that VR One compatible audio has to be encoded in AAC or MP3. AC3 audio and DTS Dolby don't seem to work.
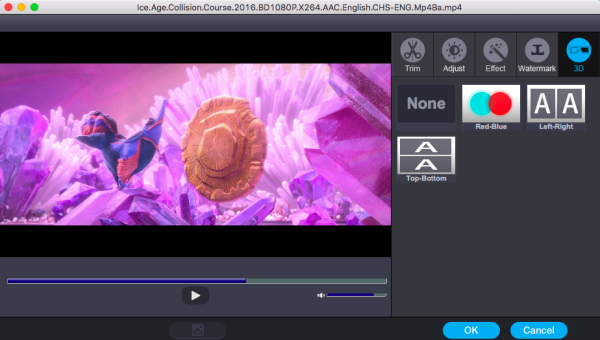
 Step 4. Set 3D mode
Click "Edit" and turn to 3D, then choose "Left-Right" and click "OK" to set 3D mode for viewing 3D Blu-ray on VR One (Plus) with 3D effect.
Step 4. Set 3D mode
Click "Edit" and turn to 3D, then choose "Left-Right" and click "OK" to set 3D mode for viewing 3D Blu-ray on VR One (Plus) with 3D effect.
 Step 4. Start converting
After you have done all the settings, return to the main interface to hit Convert button to start 3D Blu-ray to VR One (Plus) converting process. When the conversion is finished, click Open button to get the output 3D videos.
Step 5. Add and view SBS 3D movie on VR One (Plus)
The ZEISS VR ONE Cinema app enables you to enjoy your 3D movies in an immersive environment with the lights off. Download it on the Apple App Store and run it.
1.Connect your iPhone 6/6s/6s Plus to iTunes
2.Select your iPhone and go to "Apps" / "File Sharing" / "VR ONE Cinema"
3.Drag and drop any .mp4 / .mov file into the list of documents.
4.Important: DRM-protected movies (e.g. purchased movies from iTunes Store) are not supported.
* Hint: For 3D side-by-side (SBS) movies, please make sure that the filename contains "SBS".
* Movies in 720p resolution are best for watching in the VR ONE Cinema.
* Download detailed Instructions for iOS
As you see, it is extremely easy to for 3D Blu-ray enjoyment on VR One (Plus) in VR ONE Cinema without any hassles.
Note: ZEISS VR ONE is the first VR Headset to take advantage of smartphone/app technology to enable First Person View (FPV) from your drone. FPV puts you in the cockpit and lets you see exactly what your drone sees. Thanks to the ZEISS VR ONE, experiencing FPV flight has never been easier, safer or more affordable. Have fun!
Additional Tip:
Get Dimo Video Converter Ultimate for Mac/Dimo Video Converter Ultimate with Only $45.95, which can save you $63.9(BDmate $39.95 + Videomate $39.95 + DVDmate $29.95 = $109.85), then you can enjoy any Blu-ray/DVD/ISO or common movies freely on Windows 10/8/8.1/7/Vista/XP.
Related Software:
BDmate (Mac/Win)
Lossless backup Blu-ray to MKV with all audio and subtitle tracks; Rip Blu-ray to multi-track MP4; ConvertBlu-ray to almost all popular video/audio formats and devices; Copy Blu-ray to ISO/M2TS; Share digitized Blu-ray wirelessly.
DVDmate (Mac/Win)
A professional DVD ripping and editing tool with strong ability to remove DVD protection, transcode DVD to any video and audio format, and edit DVD to create personal movie.
8K Player (Mac/Win)
A mixture of free HD/4K video player, music player, Blu-ray/DVD player, video recorder and gif maker.
Free Download or Purchase BDmate for Mac:
Step 4. Start converting
After you have done all the settings, return to the main interface to hit Convert button to start 3D Blu-ray to VR One (Plus) converting process. When the conversion is finished, click Open button to get the output 3D videos.
Step 5. Add and view SBS 3D movie on VR One (Plus)
The ZEISS VR ONE Cinema app enables you to enjoy your 3D movies in an immersive environment with the lights off. Download it on the Apple App Store and run it.
1.Connect your iPhone 6/6s/6s Plus to iTunes
2.Select your iPhone and go to "Apps" / "File Sharing" / "VR ONE Cinema"
3.Drag and drop any .mp4 / .mov file into the list of documents.
4.Important: DRM-protected movies (e.g. purchased movies from iTunes Store) are not supported.
* Hint: For 3D side-by-side (SBS) movies, please make sure that the filename contains "SBS".
* Movies in 720p resolution are best for watching in the VR ONE Cinema.
* Download detailed Instructions for iOS
As you see, it is extremely easy to for 3D Blu-ray enjoyment on VR One (Plus) in VR ONE Cinema without any hassles.
Note: ZEISS VR ONE is the first VR Headset to take advantage of smartphone/app technology to enable First Person View (FPV) from your drone. FPV puts you in the cockpit and lets you see exactly what your drone sees. Thanks to the ZEISS VR ONE, experiencing FPV flight has never been easier, safer or more affordable. Have fun!
Additional Tip:
Get Dimo Video Converter Ultimate for Mac/Dimo Video Converter Ultimate with Only $45.95, which can save you $63.9(BDmate $39.95 + Videomate $39.95 + DVDmate $29.95 = $109.85), then you can enjoy any Blu-ray/DVD/ISO or common movies freely on Windows 10/8/8.1/7/Vista/XP.
Related Software:
BDmate (Mac/Win)
Lossless backup Blu-ray to MKV with all audio and subtitle tracks; Rip Blu-ray to multi-track MP4; ConvertBlu-ray to almost all popular video/audio formats and devices; Copy Blu-ray to ISO/M2TS; Share digitized Blu-ray wirelessly.
DVDmate (Mac/Win)
A professional DVD ripping and editing tool with strong ability to remove DVD protection, transcode DVD to any video and audio format, and edit DVD to create personal movie.
8K Player (Mac/Win)
A mixture of free HD/4K video player, music player, Blu-ray/DVD player, video recorder and gif maker.
Free Download or Purchase BDmate for Mac:

 Contact us or leave a message at Facebook if you have any issues.
Related Articles:
Source: How to watch 3D Blu-ray on VR One (Plus) via iPhone
Contact us or leave a message at Facebook if you have any issues.
Related Articles:
Source: How to watch 3D Blu-ray on VR One (Plus) via iPhone
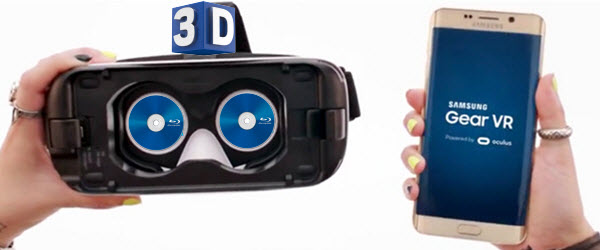
No doubt that this year is going to embrace massive new Blu-ray movies on disc. Maybe you have purchased some Blu-ray discs in 3D, and got upset because you cannot bring these 3D Blu-ray discs to Gear VR for viewing with 3D effect because it is limited by a sparse content store out of the box without 3D Blu-ray technology involved. If you're looking for an easy way to achieve your goal, you've come to the right place. Just read on to learn how to watch 3D Blu-ray on Gear VR in Oculus Cinema with 3D effect.
 It's important to know that the most VR app for Gear VR or Oculus Cinema supports 3D movies in side-by-side/top-bottom format. To get rid of the trouble with placing them in Blu-ray player and even avoid considering the region codes of commercial BDs, the only route is to rip 3D Blu-rays to Gear VR VR app supported file 3D video type.
See Gear VR Supported Media Formats
.mp4 .m4v .3gp .3g2 .ts .webm .mkv .wmv .asf .avi .flv. In our opinion, .mkv is best, while audio is aac. Only audio which Android standardly supports work and that is AAC and MP3. AC3 and DTS were removed because of high licensing costs. Make sure your movies are in 720p.
Samsung Gear VR works on the following Samsung Galaxy smartphones: Galaxy Note 5, Galaxy S6/S6 Edge/S6 Edge+, Galaxy S7/S7 Edge.
Here Dimo Video Converter Ultimate is recommended as a professional Blu-ray to Gear VR Converter. It is specially designed for remove protection from 3D Blu-ray and rip movie from 3D Blu-ray disc and BD movie folder and output SBS, Top-Bottom, Anaglyph 3D MKV, MP4 videos supported by Samsung Gear VR Unit/Innovator Edition, Oculus Rift, Google Cardboard, HTC Vive, Google Daydream View, 3D TV, etc. with best quality easily. For mac users, please turn to Dimo Video Converter Ultimate for Mac, macOS Sierra 10.12 supported.
Other functions:
* Convert Blu ray/DVD Movies to latest iOS Android devices with customized profile settings.
* World's Fastest Speed - NVIDIA CUDA technology makes conversion 6X faster than any others.
* Convert to All Mainstream Formats - Convert downloaded or recorded movies and videos to MP4, MOV, AVI, etc.
* Make ISO - 1:1 backup 2D/3D Blu-ray to ISO.
* Edit and Adjust Video - Free edit (crop, trim, add effect/watermark, etc.)
* In addition, you can also lossless copy 2D/3D Blu-ray to mkv with keeping audio tracks, subtitles, without hassle!
It's important to know that the most VR app for Gear VR or Oculus Cinema supports 3D movies in side-by-side/top-bottom format. To get rid of the trouble with placing them in Blu-ray player and even avoid considering the region codes of commercial BDs, the only route is to rip 3D Blu-rays to Gear VR VR app supported file 3D video type.
See Gear VR Supported Media Formats
.mp4 .m4v .3gp .3g2 .ts .webm .mkv .wmv .asf .avi .flv. In our opinion, .mkv is best, while audio is aac. Only audio which Android standardly supports work and that is AAC and MP3. AC3 and DTS were removed because of high licensing costs. Make sure your movies are in 720p.
Samsung Gear VR works on the following Samsung Galaxy smartphones: Galaxy Note 5, Galaxy S6/S6 Edge/S6 Edge+, Galaxy S7/S7 Edge.
Here Dimo Video Converter Ultimate is recommended as a professional Blu-ray to Gear VR Converter. It is specially designed for remove protection from 3D Blu-ray and rip movie from 3D Blu-ray disc and BD movie folder and output SBS, Top-Bottom, Anaglyph 3D MKV, MP4 videos supported by Samsung Gear VR Unit/Innovator Edition, Oculus Rift, Google Cardboard, HTC Vive, Google Daydream View, 3D TV, etc. with best quality easily. For mac users, please turn to Dimo Video Converter Ultimate for Mac, macOS Sierra 10.12 supported.
Other functions:
* Convert Blu ray/DVD Movies to latest iOS Android devices with customized profile settings.
* World's Fastest Speed - NVIDIA CUDA technology makes conversion 6X faster than any others.
* Convert to All Mainstream Formats - Convert downloaded or recorded movies and videos to MP4, MOV, AVI, etc.
* Make ISO - 1:1 backup 2D/3D Blu-ray to ISO.
* Edit and Adjust Video - Free edit (crop, trim, add effect/watermark, etc.)
* In addition, you can also lossless copy 2D/3D Blu-ray to mkv with keeping audio tracks, subtitles, without hassle!
Free Download Dimo Video Converter Ultimate (Win/Mac):
Other Download:
1. Load 3D Blu-ray files
Insert your 3D Blu-ray disc into your 3D Blu-ray drive, run the top 3D Blu-ray Ripper and click “Add Blu-ray" icon to load 3D Blu-ray movies.
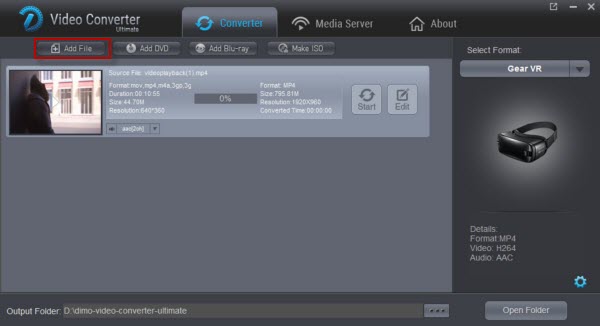 2. Choose output format
Click the format bar to follow “Select Format > Device > VR" and choose Gear VR as output device for playing 3D Blu-ray perfectly.
Tip: Although there is a profile created by the VR video converter application, we can always change parameters by clicking "Setting" to adjust the video resolution and bitrate to get more compatible format with Gear VR.
2. Choose output format
Click the format bar to follow “Select Format > Device > VR" and choose Gear VR as output device for playing 3D Blu-ray perfectly.
Tip: Although there is a profile created by the VR video converter application, we can always change parameters by clicking "Setting" to adjust the video resolution and bitrate to get more compatible format with Gear VR.
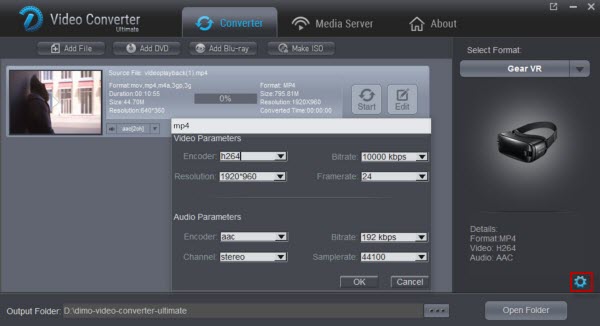 a. We recommend using 1280×720 HD resolution to encode your videos. Higher resolutions will not provide any better quality, meaning you'll waste space and processing power.
b. We also recommend using a higher bit rate than a typical web stream at that resolution, as the pixels in your video will be magnified on the phone's screen. The optimal bit rate is content dependent, and many videos can get by with less, but 5 Mb/s should give good quality. While H.264 is the recommended video coding, H.265 videos can also be played.
c. Note that 3D movies should be encoded "full side-by-side" with a 1:1 pixel aspect ratio. Content mastered at 1920×1080 compressed side -by- side 3D should be resampled to 1920×540 resolution full side -by -side resolution. Full SBS nets you the full resolution in both frames, while Half SBS gives you 960 x 1080 for each frame. On the other hand, the Over/Under format comes in 1280 x 720, with each frame coming in at 1280 x 360.
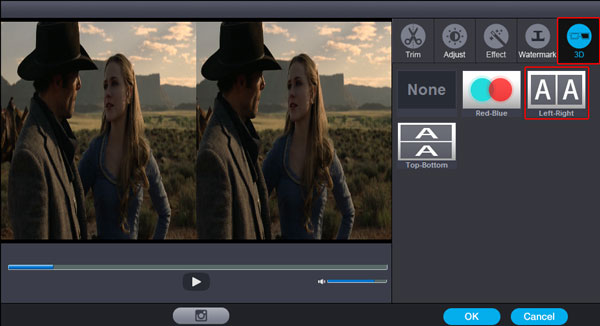
3. Add 3D effect
Click "Edit" and turn to 3D, then choose "Left-Right" or "Top-Bottom" and click "OK" to set 3D mode for viewing 3D Blu-ray on Gear VR with 3D effect.
a. We recommend using 1280×720 HD resolution to encode your videos. Higher resolutions will not provide any better quality, meaning you'll waste space and processing power.
b. We also recommend using a higher bit rate than a typical web stream at that resolution, as the pixels in your video will be magnified on the phone's screen. The optimal bit rate is content dependent, and many videos can get by with less, but 5 Mb/s should give good quality. While H.264 is the recommended video coding, H.265 videos can also be played.
c. Note that 3D movies should be encoded "full side-by-side" with a 1:1 pixel aspect ratio. Content mastered at 1920×1080 compressed side -by- side 3D should be resampled to 1920×540 resolution full side -by -side resolution. Full SBS nets you the full resolution in both frames, while Half SBS gives you 960 x 1080 for each frame. On the other hand, the Over/Under format comes in 1280 x 720, with each frame coming in at 1280 x 360.
3. Add 3D effect
Click "Edit" and turn to 3D, then choose "Left-Right" or "Top-Bottom" and click "OK" to set 3D mode for viewing 3D Blu-ray on Gear VR with 3D effect.
 4. Start 3D Blu-ray to 3D digital format for Gear VR
Click "Start" button, and the 3D Blu-ray ripper will start the conversion from 3D Blu-ray movies to 3D SBS/TB video. After the conversion, click “Open" icon to locate the converted video files. Then transfer the converted files to your phone in the ‘MyVideos' folder, and then grab some popcorn and start your theatric 3D experience at home!
Take Galaxy S7/S7 Edge as an example and see how to import converted videos to Gear VR:
There are two ways to watch your own video content in the "My Videos" section of Oculus Cinema with Gear VR via Galaxy S7/S7 Edge. First, any movies you record using your Galaxy Galaxy S7/S7 Edge′s camera will automatically appear in the "My Videos" section. The other way is to copy Gear VR compatible video files directly to your Galaxy S7/S7 Edge phone or SD card in any of the following directories:
On your phone's internal storage (Galaxy S7/S7 Edge):
/DCIM/
/Movies/
/Oculus/Movies/
On your phone's removable SD card (Card):
/DCIM/
/Movies/
/Oculus/Movies/
On a PC, your S7/S7 Edge's storage can be accessed from Windows Explorer by simply plugging in the USB data/charging cable – no software is required. On a Mac, files can be transferred to your phone using Android File Transfer (https://www.android.com/filetransfer/), which is a free utility provided by Google.
When downloading 3D movies, you'll notice that they come in either Side-by-Side (SBS) format, which comes in Full SBS and Half SBS, or Over/Under (or Top/Bottom) format. For the non-techie people, they refer to the resolution of the movies and the way the two frames are separated (vertically for the former and horizontally for the latter).
A Side-by-Side format comes in 1920 x 1080. Full SBS nets you the full resolution in both frames, while Half SBS gives you 960 x 1080 for each frame. On the other hand, the Over/Under format comes in 1280 x 720, with each frame coming in at 1280 x 360.
The Gear VR automatically assumes that all files in the "3D" folder are in the SBS format. If you have a movie in Over/Under format, you must create a text file to have it correctly read. Simply copy and paste the following to Notepad and save it in the EXACT name of the movie:
{
"format": "3DTB"
}
Yes, the quotes are included. So, Over/Under movies in your 3D movies folder should have two accompanying files: the .png file for the poster image (assuming you got one) and the aforementioned text file. Except for that last part which borders on the technical side, watching movies on your Gear VR is a simple matter. All you really need to do is copy your movies in the correct folder and you're good to go.
4. Start 3D Blu-ray to 3D digital format for Gear VR
Click "Start" button, and the 3D Blu-ray ripper will start the conversion from 3D Blu-ray movies to 3D SBS/TB video. After the conversion, click “Open" icon to locate the converted video files. Then transfer the converted files to your phone in the ‘MyVideos' folder, and then grab some popcorn and start your theatric 3D experience at home!
Take Galaxy S7/S7 Edge as an example and see how to import converted videos to Gear VR:
There are two ways to watch your own video content in the "My Videos" section of Oculus Cinema with Gear VR via Galaxy S7/S7 Edge. First, any movies you record using your Galaxy Galaxy S7/S7 Edge′s camera will automatically appear in the "My Videos" section. The other way is to copy Gear VR compatible video files directly to your Galaxy S7/S7 Edge phone or SD card in any of the following directories:
On your phone's internal storage (Galaxy S7/S7 Edge):
/DCIM/
/Movies/
/Oculus/Movies/
On your phone's removable SD card (Card):
/DCIM/
/Movies/
/Oculus/Movies/
On a PC, your S7/S7 Edge's storage can be accessed from Windows Explorer by simply plugging in the USB data/charging cable – no software is required. On a Mac, files can be transferred to your phone using Android File Transfer (https://www.android.com/filetransfer/), which is a free utility provided by Google.
When downloading 3D movies, you'll notice that they come in either Side-by-Side (SBS) format, which comes in Full SBS and Half SBS, or Over/Under (or Top/Bottom) format. For the non-techie people, they refer to the resolution of the movies and the way the two frames are separated (vertically for the former and horizontally for the latter).
A Side-by-Side format comes in 1920 x 1080. Full SBS nets you the full resolution in both frames, while Half SBS gives you 960 x 1080 for each frame. On the other hand, the Over/Under format comes in 1280 x 720, with each frame coming in at 1280 x 360.
The Gear VR automatically assumes that all files in the "3D" folder are in the SBS format. If you have a movie in Over/Under format, you must create a text file to have it correctly read. Simply copy and paste the following to Notepad and save it in the EXACT name of the movie:
{
"format": "3DTB"
}
Yes, the quotes are included. So, Over/Under movies in your 3D movies folder should have two accompanying files: the .png file for the poster image (assuming you got one) and the aforementioned text file. Except for that last part which borders on the technical side, watching movies on your Gear VR is a simple matter. All you really need to do is copy your movies in the correct folder and you're good to go.
Free Download or Purchase Dimo Video Converter Ultimate:


 Kindly Note:
The price of Dimo Video Converter Ultimate for Windows is divided into 1 Year Subscription, Lifetime/Family/Business License: $43.95/Year; $45.95/lifetime license; $95.95/family license(2-4 PCs); $189.95/business pack(5-8 PCs). Get your needed one at purchase page.
Contact us or leave a message at Facebook if you have any issues.
Related Articles:
Source: Viewing 3D Blu-ray on Samsung Gear VR in Oculus Cinema
Kindly Note:
The price of Dimo Video Converter Ultimate for Windows is divided into 1 Year Subscription, Lifetime/Family/Business License: $43.95/Year; $45.95/lifetime license; $95.95/family license(2-4 PCs); $189.95/business pack(5-8 PCs). Get your needed one at purchase page.
Contact us or leave a message at Facebook if you have any issues.
Related Articles:
Source: Viewing 3D Blu-ray on Samsung Gear VR in Oculus Cinema
Windows Media Player has various multimedia functions; it can be used to play movies, documentaries, audio-video clips etc. In some cases, MOV files are not recognized in Windows Media Player. One of the main reasons that MOV files may fail to play is due to technical issues. That may occur when the user does not have the plug-ins needed to play the MOV videos. Another problem could be with the QuickTime MOV codec. Installing a QuickTime player could solve the codec problem. However, the QuickTime player is big-sized, and it will install junks to your computer. In this article, we aim to work out the fastest solution to help you play QuickTime with Windows Media Player smoothly.
 Actually, it's not as difficult as you imagine. What you need is a just a common video converter like Dimo Video Converter Ultimate to help you watch MOV on Windows Media Player without any hassle. And you could get wonderful output files and never worry about out of audio/video sync. More than that, it also provides an access to touch up QuickTime MOV videos, which including trimming, cropping, appending artistic effects and more. If you are Mac users, please turn to Dimo Video Converter Ultimate for Mac (macOS Sierra, OS X El Capitan included). The guide below will teach you how to convert and play MOV on Windows Movie Player so you can open movies with MOV, MP4, Tivo, WMV, Blu-ray and other video files.
Free Download Dimo Video Converter Ultimate (Win/Mac):
Other Download:
How to convert QuickTime MOV to Windows Media Player?
Step 1. Add QuickTime MOV video
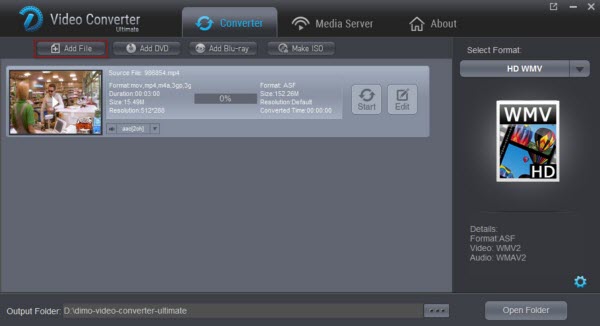
Start up the QuickTime MOV to Windows Media Player converter, and then click "Add File" to import all QuickTime MOV files.
Step 2. Choose output compatible format with Windows Media Player
Click the "Select Format" menu, select Windows Media Player friendly format as your output video format. There, you can take WMV as your output video format. If you prefer high definition videos, move your mouse pointer to "HD Video" and then choose HD WMV. To get the more compressive file, "MP4" and "HD MP4" can be your better choice.
 Tips: The smart MOV file converter additionally offers some useful edit functions to enhance your video. Click the "Edit" button to explore more features with Dimo Video Converter Ultimate.
STEP 3. Start converting QuickTime MOV to Windows Media Player
Click "Start" button to enable QuickTime MOV to WMV/MP4 conversion for playing with Windows Media Player. The conversion process will take a while, and you'll see an encoding progress bar.
Once finished, click the "Open" button in the main interface and you can locate the encoded MOV files effortlessly. And then you are able to use these files in Windows Media Player as you want.
Free Download or Purchase Dimo Video Converter Ultimate:
Kindly Note:
The price of Dimo Video Converter Ultimate for Windows is divided into 1 Year Subscription, Lifetime/Family/Business License: $43.95/Year; $45.95/lifetime license; $95.95/family license(2-4 PCs); $189.95/business pack(5-8 PCs). Get your needed one at purchase page.
Contact us or leave a message at Facebook if you have any trouble to convert QuickTime MOV for importing to Windows Media Player as you want.
Related Articles:
Tips: The smart MOV file converter additionally offers some useful edit functions to enhance your video. Click the "Edit" button to explore more features with Dimo Video Converter Ultimate.
STEP 3. Start converting QuickTime MOV to Windows Media Player
Click "Start" button to enable QuickTime MOV to WMV/MP4 conversion for playing with Windows Media Player. The conversion process will take a while, and you'll see an encoding progress bar.
Once finished, click the "Open" button in the main interface and you can locate the encoded MOV files effortlessly. And then you are able to use these files in Windows Media Player as you want.
Free Download or Purchase Dimo Video Converter Ultimate:
Kindly Note:
The price of Dimo Video Converter Ultimate for Windows is divided into 1 Year Subscription, Lifetime/Family/Business License: $43.95/Year; $45.95/lifetime license; $95.95/family license(2-4 PCs); $189.95/business pack(5-8 PCs). Get your needed one at purchase page.
Contact us or leave a message at Facebook if you have any trouble to convert QuickTime MOV for importing to Windows Media Player as you want.
Related Articles:
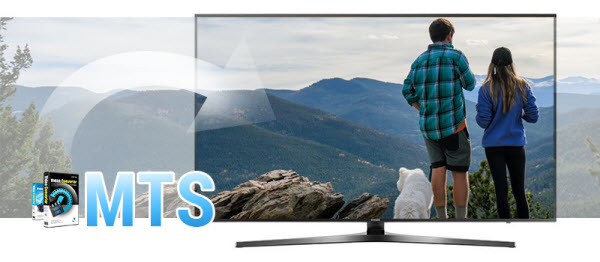
Nowadays, TV has become a big entertainment in our daily life, more and more people prefer to stream their funny movies into USB flash drive and then play them on TV for enjoyment, however, things might get stuck when you find that your TV simply can not recognize MTS/M2TS files generated in your camcorder! Well, there are so many memorable moments in your AVCHD camcorder and sharing them on big screen together with family and friends is so fantastic! But what are you going to do if they can't even be read? No worry, some warm-hearted people have already came up with a solution relating to this issue, that is, convert this high capacity high-definition MTS file to TV supported format.
 Then Dimo Video Converter Ultimate for Mac (Alternative MTS Converter for Windows) will be the third-party app to help you out. It's a professional MTS Converter for you to convert MTS to TV more friendly format i.e. H.265 MP4, H.264 MP4 and then play them on Samsung TV's big screen perfectly, which will solve "MTS Playback issue on TV" efficiently.
Free Download Dimo Video Converter Ultimate for Mac/Win:
Other Download:
With this MTS Video converter, you will also transcode MTS to MP4 or other playable video formats, such as AVI, MOV, WMV, M4V and MPEG easily on Mac or Windows. Plus, it offers kinds of preset profiles for media players including iPad, iPhone, Nexus, Nook, Samsung Galaxy Tab, Galaxy S7/S7 Edge, VR headsets, NLEs like FCP, iMovie, Premiere Pro, Avid Media Composer, etc to meet your different needs.
Simple steps to play MTS files on Smart TV
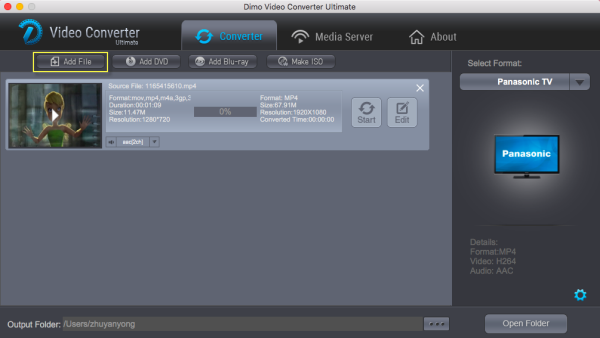
Step 1. Import MTS videos
Run the TV MTS Video Converter and then directly drag and drop the MTS, M2TS, M2T, TS videos to the program.
 Step 2. Choose the output format
Set output video format as H.264 MP4 or H.265 MP4 under Select Format > Format > Video. In general, mp4 is a well-accepted file format for its ability to save memory storage and keep up the video quality. And you can also encode H.265 for TV if your TV support this new codec.
Step 2. Choose the output format
Set output video format as H.264 MP4 or H.265 MP4 under Select Format > Format > Video. In general, mp4 is a well-accepted file format for its ability to save memory storage and keep up the video quality. And you can also encode H.265 for TV if your TV support this new codec.
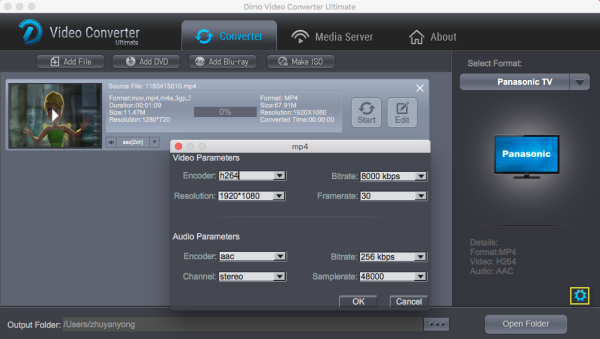 Tip 1 - Advanced settings: With the right settings you can retain the quality of the original video while also saving space. This is particularly helpful when streaming over your network. Simply click Settings bar and you can tweak the settings to your satisfaction and even save it as preset.
Tip 2 - Trim, crop and deinterlace your AVCHD MTS/M2TS files
Editing functions are available in Dimo MTS Converter for Mac by clicking "Edit" button. You are allowed to trim, crop your videos as well as adding effects, text watermarks, etc. In my case, I just made some trimming and cropping in the wedding footage.
Step 3. Start transcoding MTS to Smart/LED/LCD TV
Click the "Start" button to convert the MTS file to TV. This MTS Converter for Mac will finish the MTS to TV conversion on Mac(OS Sierra) in just a few minutes. After conversion, you can transfer all the output files to a usb drive and thenplay them on TV via a USB cable or you can directly stream them over DLNA, using Plex media server or Dimo freee media server.
Free Download or Purchase Dimo Video Converter Ultimate for Mac/Win:
Kindly Note:
The price of Dimo Video Converter Ultimate for Mac is divided into 1 Year Subscription, Lifetime/Family/Business License: $43.95/Year; $45.95/lifetime license; $95.95/family license(2-4 Macs); $189.95/business pack(5-8 Macs). Get your needed one at purchase page.
Related Software:
BDmate (Mac/Win)
Lossless backup Blu-ray to MKV with all audio and subtitle tracks; Rip Blu-ray to multi-track MP4; Convert Blu-ray to almost all popular video/audio formats and devices; Copy Blu-ray to ISO/M2TS; Share digitized Blu-ray wirelessly.
DVDmate (Mac/Win)
A professional DVD ripping and editing tool with strong ability to remove DVD protection, transcode DVD to any video and audio format, and edit DVD to create personal movie.
Videomate (Mac/Win)
An all-around video converter software program that enables you to convert various video and audio files to formats that are supported by most multimedia devices.
8K Player (Mac/Win)
A mixture of free HD/4K video player, music player, Blu-ray/DVD player, video recorder and gif maker.
Contact us or leave a message at Facebook if you have any issues.
Related Articles:
Source: Convert MTS files to TV H.265 MP4/H.264 MP4 for Playback
Tip 1 - Advanced settings: With the right settings you can retain the quality of the original video while also saving space. This is particularly helpful when streaming over your network. Simply click Settings bar and you can tweak the settings to your satisfaction and even save it as preset.
Tip 2 - Trim, crop and deinterlace your AVCHD MTS/M2TS files
Editing functions are available in Dimo MTS Converter for Mac by clicking "Edit" button. You are allowed to trim, crop your videos as well as adding effects, text watermarks, etc. In my case, I just made some trimming and cropping in the wedding footage.
Step 3. Start transcoding MTS to Smart/LED/LCD TV
Click the "Start" button to convert the MTS file to TV. This MTS Converter for Mac will finish the MTS to TV conversion on Mac(OS Sierra) in just a few minutes. After conversion, you can transfer all the output files to a usb drive and thenplay them on TV via a USB cable or you can directly stream them over DLNA, using Plex media server or Dimo freee media server.
Free Download or Purchase Dimo Video Converter Ultimate for Mac/Win:
Kindly Note:
The price of Dimo Video Converter Ultimate for Mac is divided into 1 Year Subscription, Lifetime/Family/Business License: $43.95/Year; $45.95/lifetime license; $95.95/family license(2-4 Macs); $189.95/business pack(5-8 Macs). Get your needed one at purchase page.
Related Software:
BDmate (Mac/Win)
Lossless backup Blu-ray to MKV with all audio and subtitle tracks; Rip Blu-ray to multi-track MP4; Convert Blu-ray to almost all popular video/audio formats and devices; Copy Blu-ray to ISO/M2TS; Share digitized Blu-ray wirelessly.
DVDmate (Mac/Win)
A professional DVD ripping and editing tool with strong ability to remove DVD protection, transcode DVD to any video and audio format, and edit DVD to create personal movie.
Videomate (Mac/Win)
An all-around video converter software program that enables you to convert various video and audio files to formats that are supported by most multimedia devices.
8K Player (Mac/Win)
A mixture of free HD/4K video player, music player, Blu-ray/DVD player, video recorder and gif maker.
Contact us or leave a message at Facebook if you have any issues.
Related Articles:
Source: Convert MTS files to TV H.265 MP4/H.264 MP4 for Playback
MOV is a multimedia format that is used for saving and creating video files. It was developed by Apple for their Macintosh systems. MOV may contain video, audio, animation, graphics, virtual reality, 3D, and text information. This file format is easily manipulated with the right software installed. However, opening MOV files in Camtasia Studio can be frustrating from time to time for the complex video codec of MOV.
"Your website says Camtasia Studio should be able to import/edit .mov files. The only type of file my Kodak video camera produces is .mov but Camtasia won't recognize those files when I try to import them and I get a 'No available codec' error."
In this article, you'll learn how to edit MOV videos in Camtasia Studio using three methods: uninstalling, renaming or converting MOV to Camtasia compatible video formats.
 Method 1. Uninstall QuickTime correctly
With Apple's decision to no longer support updates to QuickTime on Windows the US government posted the following announcement advising users to uninstall the QuickTime software. To avoid the vulnerabilities in the announcement we do recommend uninstalling the QuickTime software.
Method 2. Rename MOV to MP4 and import again
If the .MOV file is encoded in H.264 video and AAC audio that file can be imported and played without the use of QuickTime. If it doesn't import, simply change the extension of the file to .mp4 instead of .mov and try importing again. Any other type of .MOV files will not be able to be imported into Camtasia Studio.
Method 3. Convert MOV for importing to Camtasia Studio
Then what if you need to edit a .MOV that is not able to be imported into Camtasia Studio using the above methods? You'd better find an actual fix. As metioned, a .mov may use different codecs. It could be DNxHD, ProRes, DVCPRO, etc. So, you can't edit a MOV video directly in Camtasia Studio including the lastest Camtasia Studio 9.0.0.
An easy workaround is to change the file extentsion from "MOV" to "a codec" that Camtasia can read more easily (without rendering basically). The codec is H.264/MPEG-1, which ensures maximum editing quality and efficiency when working with Camtasia Studio. To convert MOV files to Camtasia, Dimo Video Converter Ultimate is an easy-to-use yet professional app to achieve your goal smoothly.
Unlike converting MOV with latest updated Handbrake 1.0.0, it is a free-to-try MOV converting application for Windows that features simple and user-friendly tools, functionalities for all your video needs and more video outputs.
It is designed to assist you to convert all MP4, MKV, FLV, SWF, MPEG-2, VOB, MXF, MPG, MOD, WEBM to Camtasia Studio with no efforts. It will ensure a perfect QuickTime file importing, playing and editing workflow with Camtasia Studio 9/8/7/6. For Mac users, just get Dimo Video Converter Ultimate for Mac to get th job done.
Method 1. Uninstall QuickTime correctly
With Apple's decision to no longer support updates to QuickTime on Windows the US government posted the following announcement advising users to uninstall the QuickTime software. To avoid the vulnerabilities in the announcement we do recommend uninstalling the QuickTime software.
Method 2. Rename MOV to MP4 and import again
If the .MOV file is encoded in H.264 video and AAC audio that file can be imported and played without the use of QuickTime. If it doesn't import, simply change the extension of the file to .mp4 instead of .mov and try importing again. Any other type of .MOV files will not be able to be imported into Camtasia Studio.
Method 3. Convert MOV for importing to Camtasia Studio
Then what if you need to edit a .MOV that is not able to be imported into Camtasia Studio using the above methods? You'd better find an actual fix. As metioned, a .mov may use different codecs. It could be DNxHD, ProRes, DVCPRO, etc. So, you can't edit a MOV video directly in Camtasia Studio including the lastest Camtasia Studio 9.0.0.
An easy workaround is to change the file extentsion from "MOV" to "a codec" that Camtasia can read more easily (without rendering basically). The codec is H.264/MPEG-1, which ensures maximum editing quality and efficiency when working with Camtasia Studio. To convert MOV files to Camtasia, Dimo Video Converter Ultimate is an easy-to-use yet professional app to achieve your goal smoothly.
Unlike converting MOV with latest updated Handbrake 1.0.0, it is a free-to-try MOV converting application for Windows that features simple and user-friendly tools, functionalities for all your video needs and more video outputs.
It is designed to assist you to convert all MP4, MKV, FLV, SWF, MPEG-2, VOB, MXF, MPG, MOD, WEBM to Camtasia Studio with no efforts. It will ensure a perfect QuickTime file importing, playing and editing workflow with Camtasia Studio 9/8/7/6. For Mac users, just get Dimo Video Converter Ultimate for Mac to get th job done.
Free Download Dimo Video Converter Ultimate (Win/Mac):
Other Download:
How to Convert MOV and Import MOV to Camtasia Studio 9/8/7/6
Step 1: Load MOV files to the program
Launch the MOV to Camtasia Studio Converter and click "Add file" button to locate the MOV file(s) you want to add.
 Step 2: Select output format
Click "Select Format" bar and then move your pointer to "Format" and turn to "HD Video" or "Video" and choose MPEG-1 or MOV as target format. Besides, you can also choose AVI, WMV, MP4, etc. if you want to get a relatively smaller output file.
Step 3 (optional): Adjust the video, audio settings
Click "Settings" to fix the frame rate, bitrate, video size, etc to your needs. If you want to edit in Camtasia Studio without having to render the clips while editing, all the frame sizes must be the same as the sequence settings. You can save a lot of render time by making all the clips the same size with this MOV video converter.
Step 2: Select output format
Click "Select Format" bar and then move your pointer to "Format" and turn to "HD Video" or "Video" and choose MPEG-1 or MOV as target format. Besides, you can also choose AVI, WMV, MP4, etc. if you want to get a relatively smaller output file.
Step 3 (optional): Adjust the video, audio settings
Click "Settings" to fix the frame rate, bitrate, video size, etc to your needs. If you want to edit in Camtasia Studio without having to render the clips while editing, all the frame sizes must be the same as the sequence settings. You can save a lot of render time by making all the clips the same size with this MOV video converter.
 Step 4: Start MOV to Camtasia Studio conversion on Mac
Click the big "Start" button at the bottom right corner to finish transcoding MOV for Camtasia Studio. When the conversion is done, you can find the output files by clicking "Open" button on the main interface, then you can import the encoded files to Camtasia Studio 9/8/7/6 to open and edit with ease. Once you've got your video edited, you can export to any codec/container, even to MOV that you'd like for playing and sharing.
Free Download or Purchase Dimo Video Converter Ultimate:
Kindly Note:
The price of Dimo Video Converter Ultimate for Windows is divided into 1 Year Subscription, Lifetime/Family/Business License: $43.95/Year; $45.95/lifetime license; $95.95/family license(2-4 PCs); $189.95/business pack(5-8 PCs). Get your needed one at purchase page.
Contact us or leave a message at Facebook if you have any issues of playing MOV on Camtasia Studio for editing.
Related Articles:
Source From: [3 Methods]How can I open .mov in Camtasia Studio for editing
Step 4: Start MOV to Camtasia Studio conversion on Mac
Click the big "Start" button at the bottom right corner to finish transcoding MOV for Camtasia Studio. When the conversion is done, you can find the output files by clicking "Open" button on the main interface, then you can import the encoded files to Camtasia Studio 9/8/7/6 to open and edit with ease. Once you've got your video edited, you can export to any codec/container, even to MOV that you'd like for playing and sharing.
Free Download or Purchase Dimo Video Converter Ultimate:
Kindly Note:
The price of Dimo Video Converter Ultimate for Windows is divided into 1 Year Subscription, Lifetime/Family/Business License: $43.95/Year; $45.95/lifetime license; $95.95/family license(2-4 PCs); $189.95/business pack(5-8 PCs). Get your needed one at purchase page.
Contact us or leave a message at Facebook if you have any issues of playing MOV on Camtasia Studio for editing.
Related Articles:
Source From: [3 Methods]How can I open .mov in Camtasia Studio for editing